Thursday, December 26, 2013

AIR December 3 - Everyday card


For the last project for AIR, I decided to make encouraging card with these cute birds.  
This saying is touching my heart, giving me a smile.  It's a good way to closing year of 2013.


Supplies:
IMAGINE Crafts®/Tsukineko® StazOn® Solvent Inks in Jet Black
IMAGINE Crafts®/Tsukineko® Memento™ Dye Ink Markers

Stamps - Stampotique - 4027 Stack of Birds
                                     - 7319 Enjoy Today
Design Paper - Authentique Paper

How To

Stamp the birds with StazOn in Jet Black on coated Paper

Color with Memento Markers - start with lightest color to base coat, then adding colors 

For eyes, use Summer Sky as shades.

I used a lot of colors

Add shadow around and bottom with Summer sky for finishing touch

Add dots vine stamp with StazOn in Jet Black, then color with Memento Markers
Stamp the sentiment in same way, trim and layer on the folded card.


------------------------

It's been a great pleasure to be an Artist In Residence of Imagine Crafts/Tsukineko for 2 years.
Every assignments are challenging to me, as a result, gave me a great experiences.

My duty for AIR is over though, new AIR team for 2014 is forming, soon they start making great projects. Please look up Face Book and Blog  of Imagine Crafts/Tsukineko.

I'm keep on stamping, and sharing my projects here too, so please check my blog often.

Thank you John and Imagine Crafts/Tsukineko team!!


Tuesday, December 24, 2013

Merry Christmas

Hi all

It is beautiful day here in San Diego, perfect to celebrate joyful day.

Hope everyone has great holiday season ever.


Wednesday, December 11, 2013

AIR December 2 - Christmas Card


Hi All

My second AIR project this month is "Christmas Card".
When I see the holy branch stamp from Penny Black, I already knew what to do with it - so elegant, so sensitive.
It is kind a simple card so that good for making a lot of them.

Here we go!

Supplies
IMAGINE Crafts®/Tsukineko® Brilliance™ Pigment Ink 
  in Rocket Red Gold, Pearlscent Ivy, Pearlscent Crimson
IMAGINE Crafts®/Tsukineko® Jumbo Daubers™

Stamps - Penny Black
Design Paper - Penny Black
Ribbon - May Arts
Flatback pearls

How To:
Fold copy paper 4" wide to make straight mask. (my panel is 5" squares)

Insert 5" panel to the folded line so that only 1" from the edge will be shown.  Using Jumbo Dauber, apply Brilliance in Rocket Red Gold half way from the top.

Turn the panel 180 degrees, repeat the same procedure, but this time, color half way from the bottom.

Stamp holly branch with Brilliance in Pearl. Ivy

Stamp words with Brilliance in Pearl Criomson

Assemble panels to half folded card (6 x 6" in finish)

Add tiny flat back pearls as berries.  Apply bowed ribbon to the branch for finishing touch.

That's it!!

Thank you for visiting


Monday, December 9, 2013

AIR December - Christmas Box - Ruby Rock-it

Hi all!!

I just can't believe it's December already.. well, I've been saying the same thing every year.

Anyway, it's a Christmas season, and our mission this month is making goodie with Ruby Rock-It paper and embellishments.... so my project is Recycled shoebox.


Supplies:

IMAGINE Crafts® GlazOn™ Layer Protectant
IAMGINE Crafts® Mini Squeegee™
IMAGINE Crafts®/Tsukineko® Brilliance™ Pigment Ink
IMAGINE Crafts® Creative Medium™
IMAGINE Crafts®/Tsukineko® Sponge Daubers™


Red Card Stock
Spellbinders die
white glue

How to:


This is the shoe box I used.

Apply generous amount of Creative Medium with Mini Squeezee

Apply Design paper then add Creative Medium over the paper as sealer.

Keep on working covering the box surface

The box is covered all over

Add some borders and cutout with white glue

Punch out frame and panel,  color edges with Brilliance in Galaxy Gold
Die cut frame from red card stock, edge color with Brilliance in Lightening Black.

Apply GlazOn onto panel, spread out with finger. Let it dry.

Assemble panels over ribbon.


That's it.
thank you for visiting


Monday, November 25, 2013

Nov. AIR 3 - Artist choice - Memento Markers


Happy Thanksgiving for US buddy, happy harvesting time for other countries.
For this month's project, I picked Memento Marker coloring technique.

Unlike Copic or other brand of alcoholic ink markers, Memento Marker is water based yet fade resistant.  So your artwork will last longer

I have a little trick to blending Memento Marker colors

  1. Use glossy paper - it will give me a longer time to blend colors on the paper. 
  2. Use lightest color marker for base coat. Memento have nice light colors.
  3. Use tapping motion - like dots - to add shade, then blending with lighter color marker with same tapping motion.

In addition to above 3 tips, using black embossing powder will help the image crisper and make marker colors more vibrant.

SUPPLIES
  • IMAGINE Crafts®/Tsukineko® VersaMark™ Watermark Ink
  • IMAGINE Crafts®/Tsukineko® Embossing Powder in Black
  • IMAGINE Crafts®/Tsukineko® Ink Potion No. 9™ Blending Solution
  • IMAGINE Crafts Brushstix™
  • IMAGINE Crafts®/Tsukineko® Memento™ Dye Ink MARKER in
Dandelion
Cantaloupe
Tangelo
Angel Pink
Love Letter
Morocco
Rhubarb Stalk
Desert Sand
Potter's Clay
Peanut Brittle
Toffee Crunch
New Sprout
Pear Tart
Bamboo Leaves
Cottage Ivy
Espresso Truffle
Summer Sky

Other supplies & Tools

Stamps - Crafters Companions
Printed paper - Graphic 45
Cutting Dies - Spellbinders
Paper flowers & Leaves
Flat back pearls


HOW TO

.


Stamp image with VersaMark and heat emboss with black embossing powder on glossy paper

Color face - with Angel Pink, trace inside of face line, then blend in toward face center with Ink Portion No.9 using Brushstix.

With Angel Pink, base coat other part of skin then use Desert Sand to give shades in tapping motion..

Blending 2 colors with Angel Pink in tapping motion.

Add more shades with Potter's Clay. Blend colors same way as above.

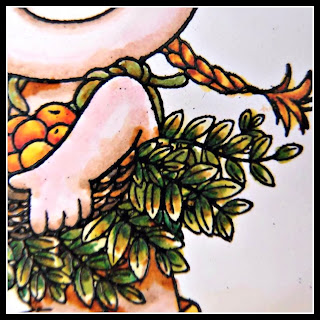
Color leaves with New Sprout. 


Shade with Pear Tart

Add Bamboo Leaves

Cottage Ivy for deepest shades

For Hair, basecoat with Dandelion

Shade with Cantaloup

Add Tangelo for deeper shades

For fruits, start with Dandelion, then, Cantaloup and Tangerin for shade

For deeper shade, Rhubarb Stalk is added

For Shoes, started with Cantaloup

then Potter's Clay for shade

Blending withe Cantaloupe

For basket, start with Desert Sand

Add Peanut Brittle 

And Toffee Crunch for deepest shade

For shoulder ties, Bamboo Leaves is used for base coat

 Peanut Brittle for shade, also added to some leaves

Use Toffee Crunch for here and there for deeper shades 

Cheeks are started with tiny dots of Love Letter

With Angel Pink, blend out Love Letter to outside


That's it for coloring.

For finishing card, assemble panels, add paper flower and leaves.
Sentiment is stamped with VersaMark and heat embossed with black embossing powder as well.

Happy celebrating!